Foolproof Spatchcock Turkey: Fast Cooking & Juicier Thanksgiving
Every year, as the crisp autumn air signals the approach of Thanksgiving, many home cooks grapple with the age-old culinary dilemma: how to achieve that perfectly cooked, impossibly juicy turkey without sacrificing precious hours or ending up with a dry, disappointing bird. The quest for the ideal holiday centerpiece often involves researching countless methods, each promising success. But what if there was a genuinely foolproof technique that not only slashed roasting time but also guaranteed a more flavorful, succulent, and beautifully browned turkey every single time? Enter the
spatchcock turkey.
This game-changing method, also known as butterflying, transforms your whole turkey from an unwieldy, unevenly cooking behemoth into a flat, even canvas for culinary magic. It’s a technique that delivers on its promises of full flavor, maximum juiciness, and significantly reduced cooking duration, making it an absolute must-try for your next Thanksgiving feast. Imagine spending less time fretting over the oven and more time enjoying your guests and the festive atmosphere. That’s the true gift of the spatchcock approach.
Why Spatchcock? The Science of Superior Turkey
The secret behind the spatchcock turkey's remarkable success lies in its simple yet ingenious preparation. By removing the backbone and flattening the bird, you fundamentally alter its cooking dynamics, addressing several common turkey challenges head-on.
Firstly,
even cooking is the immediate benefit. A traditional whole turkey, with its thick breast and slender legs, inherently cooks unevenly. The breast, being leaner, tends to dry out before the thighs and drumsticks, which require a higher internal temperature to reach optimal tenderness, are fully cooked. Spatchcocking flattens the bird, allowing the breast and thighs to cook at a more uniform rate. The legs and thighs, now more exposed, crisp up beautifully while the breast meat remains moist and tender.
Secondly,
significantly reduced cooking time is a major draw. A flattened turkey has more surface area exposed to the oven's heat, leading to much faster heat penetration. This can cut your roasting time by as much as 30-50%, depending on the size of your bird and oven calibration. This means less time in the kitchen and more time enjoying the holiday with loved ones.
Thirdly, you achieve
crispier skin and better browning. With the entire skin exposed directly to the heat, you're guaranteed a gorgeously golden-brown, irresistibly crispy skin across the entire bird. No more pale undersides or unevenly cooked patches. Every piece gets a share of that coveted crackly skin.
Finally, the spatchcock method allows for
enhanced flavor absorption. With the bird flattened, it's easier to apply rubs, marinades, or herb-infused spreads directly to the meat and under the skin, ensuring deep flavor penetration throughout. This revolutionary method truly elevates your turkey from a mere centerpiece to a culinary triumph.
The Step-by-Step Spatchcock Process (Demystified)
Don't be intimidated by the idea of spatchcocking; it's a straightforward process that yields incredible results. While it involves a bit of butchering, it's manageable for any home cook with the right tools and approach.
1.
Preparation is Key: Begin with a thawed turkey. For a medium-sized bird (8-12 pounds), plan at least 3-5 days for thawing in the refrigerator. Once thawed, remove the turkey from its packaging, remove the giblets and neck from the cavity, and rinse it thoroughly under cold water. The most crucial step here is to
pat the turkey bone-dry with paper towels. Dry skin is essential for crispiness.
2.
Positioning for Success: Place the turkey breast-side down on a sturdy, non-slip cutting board. You’ll be working on the backbone, so ensure good stability.
3.
Removing the Backbone: This is the core of the spatchcocking process. You have two main tool options:
*
Heavy-Duty Kitchen Shears: These are often recommended as they provide excellent leverage and control. Starting from the tail end, cut along one side of the backbone, working your way up to the neck. Repeat on the other side.
*
Sharp Chef’s Knife: If you don't have shears, a very sharp, sturdy chef's knife can be used. It requires more force and careful handling to cut through the ribs and backbone, so exercise extra caution.
Once both cuts are made, remove the backbone.
Don't discard it! The backbone, along with the neck and giblets, is an excellent base for homemade turkey stock or a rich, flavorful gravy. This adds another layer of depth to your Thanksgiving meal.
4.
Flattening the Bird: Flip the turkey over so it's breast-side up. Using the palms of your hands, press down firmly on the breastbone (sternum) until you hear a crack. This flattens the bird, allowing it to lie completely flat. Some people find placing a clean kitchen towel over the bird before pressing can provide extra grip and prevent slipping. Tuck the wing tips under the breast to prevent them from burning during roasting.
For a complete visual walkthrough and more in-depth tips on this technique, especially if you're new to it, consider exploring resources like
Spatchcock Turkey: Your Secret to a Faster, Juicier Holiday Meal.
Flavor Infusion: Beyond the Basics
Once your turkey is spatchcocked, it’s a blank canvas for incredible flavor. This method truly shines when you get creative with seasonings.
*
The Power of a Spread: A popular and highly effective technique is to use a flavored spread, like a lemon and herb mayonnaise or softened butter. Mayonnaise, in particular, is an excellent vehicle as it doesn’t solidify like butter, spreads easily, and helps create a beautiful golden crust. Combine it with fresh lemon zest, minced garlic, finely chopped fresh thyme and rosemary, dried oregano, and onion powder.
*
Under the Skin Magic: For maximum flavor and moisture, gently separate the skin from the breast meat and spread a good portion of your chosen rub or spread directly onto the meat. This ensures the flavor permeates the muscle, not just the surface.
*
Brining for Brilliance: While spatchcocking itself guarantees juiciness, for an extra layer of moisture and flavor, consider brining your turkey for 12-24 hours beforehand. A simple apple cider turkey brine can add incredible depth.
*
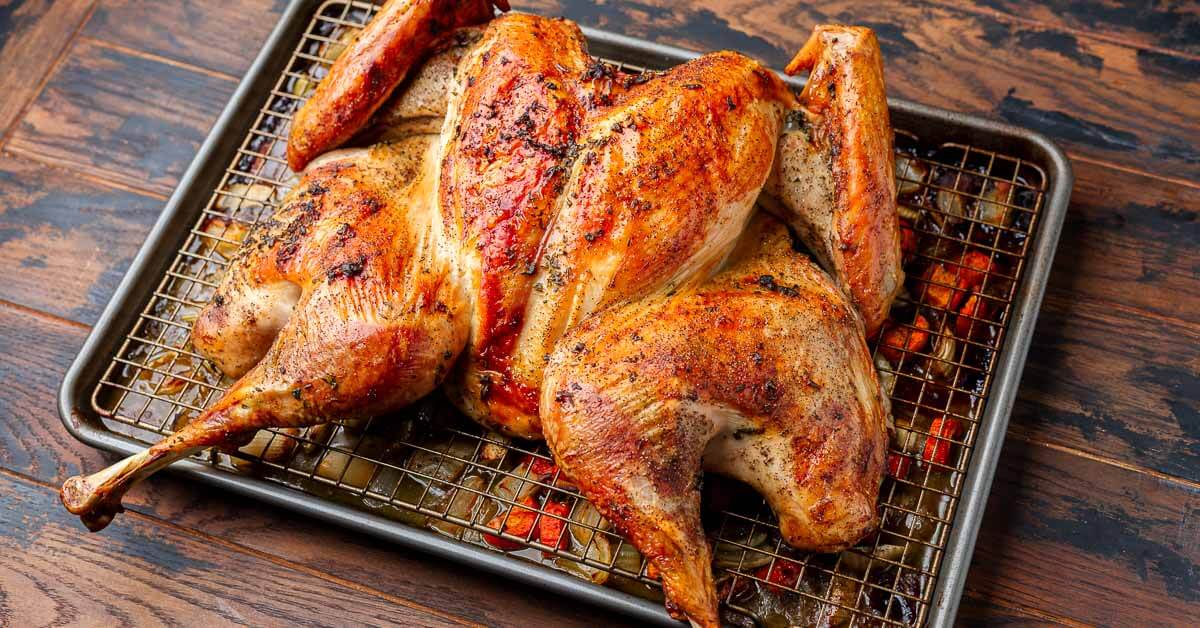
Aromatic Roasting Bed: To infuse even more flavor and keep the turkey elevated for even cooking, create a bed of aromatics in your roasting pan. Slice onions, apples, oranges, and lemons into ½-inch wedges, and chop carrots and celery into 1-inch chunks. Layer these with whole garlic cloves and sprigs of fresh thyme and rosemary in the bottom of a large, deep roasting pan. This not only imparts incredible aroma and flavor to the turkey but also provides a fantastic base for your pan drippings gravy.
Roasting to Perfection: Timing and Tips
The final stage is the roast itself, and here too, the spatchcock method simplifies things considerably.
1.
Preheat & Pan Setup: Preheat your oven to a consistent 400°F (200°C). Arrange your aromatic bed in the roasting pan as described above. Place a wire rack directly over the aromatics. Pour 2 cups of chicken broth into the pan; this will keep the aromatics moist and contribute to your delicious pan drippings.
2.
Position the Turkey: Carefully place the spatchcocked turkey, breast-side up, on the wire rack over the aromatics. Ensure it's centered and lying flat.
3.
Roasting Time: A typical 10-14 pound spatchcock turkey will roast in approximately 90-120 minutes at 400°F. This is significantly faster than a traditional whole turkey, which can take 3-4 hours or more. Always use a reliable meat thermometer to check for doneness. The breast meat should reach an internal temperature of 165°F (74°C), and the thigh meat should reach 175°F (79°C). The beauty of spatchcocking is that these temperatures are often reached simultaneously or very close to each other.
4.
Resting is Essential: Once the turkey reaches the desired internal temperature, remove it from the oven and transfer it to a clean cutting board. Tent it loosely with foil and let it rest for at least 20-30 minutes (up to 45 minutes for larger birds) before carving. This crucial step allows the juices to redistribute throughout the meat, ensuring every bite is incredibly tender and moist. Skipping the rest will result in a drier turkey, even after perfect cooking.
5.
Gravy Glory: While the turkey rests, use the flavorful pan drippings from your roasting pan to create an unbeatable gravy. Simply strain out the aromatics, skim off excess fat, and use the liquid as the base for your roux-thickened gravy. The combination of turkey juices, broth, and the essence of roasted vegetables will make for an unforgettable accompaniment. For more expert guidance on crafting the perfect spatchcock turkey with delightful flavor profiles and gravies, you might want to delve into
Master Spatchcock Turkey: Lemon & Herb for Juicy Holiday Feasts.
Embrace the spatchcock revolution this Thanksgiving, and say goodbye to dry turkey and endless cooking times. This method truly is a game-changer, promising a juicier, more flavorful, and beautifully presented bird that will impress your guests and make your holiday meal planning a breeze. You'll wonder why you ever cooked a turkey any other way!